Wednesday, 31 December 2008

Upgrading MSI Wind To The 1.0A BIOS

I am the proud owner of a MSI Wind U90 Notebook :)
A few nights ago I decided to check out the MSI Wind forum, and I was amazed at how many hacks and tweaks you can do to it! I noticed a lot of talk about upgrading the BIOS to improve performance, so that's the first thing I have decided to do to my notebook.

There are many different ways in which you can upgrade your BIOS, but I found this to be the best way for me. Of course, you will be able to use this method for any type of notebook, and for any type of BIOS. Before I continue, upgrading your BIOS can be dangerous, so please, only follow these steps if you are comfortable with what you are doing. It will not be my fault if it all goes wrong!

So, this is how I upgraded the BIOS.

1. Create new FAT16 partition
2. Install FreeDOS
3. Copy over BIOS files
4. Flash!


So, to begin with, you will need to create a new partition on your hard drive. The easiest way to do this is to boot your notebook up in LiveCD mode. Check out this post to see how to do this from a USB stick: http://jamsubuntu.blogspot.com/2008/10/msi-wind-mini-notebook.html. Note: you will only need to follow the first few steps.

Once you can see the desktop, you are ready to go!
System -> Administration -> Partition Editor
If you are unsure on how to use Partition Editor, please leave a comment saying, and I will add instructions on how to do the following steps
Now before I could add a new partition, I had to shrink the main partition that I had on. Once shrunk, I created a new partition (about 25Mb in size... although to be fair, you could get away with a 5Mb partition). I then formatted this partition in FAT16.

Now that you have your new partition on, you will need to install FreeDOS. (It's best if you reboot your PC, and login as normal for this).
Before we can begin to install FreeDOS, we will have to mount the partition:
sudo mkdir /mnt/freedos
mount /dev/sdaX /mnt/freedos

*Replace X in sdaX with the correct number that applies to you
Now to download and install FreeDOS:
cd /mnt/freedos
sudo -i
wget http://odin.fdos.org/fdodin06.bin.zip
unzip fdodin06.bin.zip fdodin06.144
rm -f fdodin06.bin.zip
cp /usr/lib/syslinux/memdisk .

* Note on the last command the '.' at the end - this isn't an error.

Now that FreeDOS has been installed on the partition that we have created for it, we must edit the Grub list to show this partition in. To do this:
sudo gedit /boot/grub/menu.lst

Once opened, you will need to add the following lines to the bottom of the file:
root (hd0,X)
title FreeDOS
kernel /memdisk
initrd /fdodin06.144


* replace X with the correct number for your MSI Wind. Remember, 0 counts as the first partition. So if your FreeDOS partition is at sda4, the X would be 3.

We now have the ability to boot up the FreeDOS partition! The next thing we need to do is to download the BIOS files:
cd /mnt/freedos
sudo -i
wget http://download1.msi.com.tw/files/downloads/bos_exe/n011_10a.zip
unzip n011_10a.zip
rm n011_10a.zip


Now you are ready to reboot your laptop. As the Grub is loading, press ESC, and choose the FreeDOS option. You will soon be at the FreeDOS start screen, prompted with A:\. To upgrade the BIOS, make sure that you have your Power lead connected - as a sudden power loss at this time could cause damage to your notebook. Once all set to go, type the following:
C:
flash.bat

Let the batch file do it's job, and once complete, you are ready to power of your notebook. Once turned off, disconnect the power lead, and the battery. Once disconnected for 20 seconds, reconnect, and boot up your MSI Wind.
Press DEL to enter the BIOS settings, and load the default settings, and save and exit. You now have the new 10A BIOS!

I would like to thank the user Domo on http://forums.msiwind.net

Goodbye Rhythmbox, Welcome Songbird!

Although I don't like to admit it, I have always liked the iTunes media player. I know it hogs so much RAM, and that it loves to crash half way through your most loved song - but it is so sexy. I wasn't too keen on the idea of installing and running it through Wine, as it would only use even more RAM then before. I settled for Ryhthmbox in the end, even though it didn't really compare at all to iTunes. I finally had enough of its uglyness this evening, and went on the search to find a better alternative. After a bit of Googling,I had found it!

Songbird is far from just your normal media player. As well as having the ability to play your normal music, it has an integrated web browser, integrated Last.fm support and many different skins and plug-ins.


Songbird
Image From: http://www.getsongbird


So what are you waiting for? Run the following command to download it:
wget http://download.songbirdnest.com/installer/linux/i686/Songbird_1.0.0-860_linux-i686.tar.gz

Now to unpack it:
tar zxvf Song*.tar.gz

Now we will want to move the icon png image to a different location. You can chose a different location from me if you wish:
cd Songbird
sudo mv songbird.png /usr/share/pixmaps

Rather then having more folders and files cluttering up my home folder, I decided to move the folder to /opt. To do this, run the following command:
cd ..
sudo mv Songbird/ /opt/

The only problem now is that you will have to be root to launch the application. To get around this problem, you will need to change the ownership of the files:
cd /opt
sudo chown -hR username Songbird

*Change username for your username!
You can now run the application by using the following command:
/opt/Songbird/songbird


Rather then having to type that command out every time to launch it, you can add the application to the menu. To do this, right click on your menu -> Edit Menu. Now choose which section you wish to place it - I chose Sound & Video, Then chose New Item. Use the following details in the pop-up window:

Name: Songbird
Command: /opt/Songbird/songbird
Comment: Thanks jamsubuntu.blogspot.com!

To change the icon, click on the image in the top left, and navigate to where you original moved the Songbird icon (/usr/share/pixmaps). When you have found the icon you wish to use, simply click on it to replace it with the default icon. Click OK to complete it.

Sunday, 28 December 2008

The Best Pidgin Hacks & Mods

Pidgin is a cross platform chat client which is both free, and easy to use. You can connect to many different networks at the same time. PidginPidgin supports all the major chat networks like AIM, MSN, Yahoo, and also supports a lot of the less well used networks like Myspace, Google Talk & Zephr. Pidgin now also has the support for IRC chat rooms. With a few of these little tweaks and hacks below, it will allow your Pidgin to support a number of different protocols & become the ultimate application for your Ubuntu

Facebook Protocol
Facebook
This plugin allows you to connect to the Facebook Chat service. Currently the plugin allows you to login, view your buddy list, send & receive messages, add & remove friends, receive notifications, search for Facebook new friends and set your Facebook status!

To download and install this plugin, use the following command:
wget http://pidgin-facebookchat.googlecode.com/files/pidgin-facebookchat-1.45.deb && sudo dpkg -i pidgin-facebookchat-1.45.deb

Once installed, you will need to restart Pidgin. To add your Facebook account, goto Accounts -> Manage Accounts -> Add -> Facebook Chat


---------------

Frost Wire IRC Chat
Frostwire
As many of you may know, Frost Wire is the P2P application to have with your Ubuntu distribution. [Post On Downloading, Installing & Using Frost Wire coming soon!] To connect to the built in IRC chat function from within Pidgin, Accounts -> Manage Accounts -> Add - > IRC.
Your user name will be name that you want other people to see you as (In my case, HomeMadeJam). For the server, you will want to use the following: chat.peercommons.net.


---------------

Twitter
twitter Yes, you can even update your twitter account from within Pidgin! To do this, you will need to add a set of repositories to your /etc/apt/sources.list file.
sudo gedit /etc/apt/sources.list

And add the following if you are using Intrepid :
deb http://ppa.launchpad.net/sugree/ubuntu intrepid main
deb-src http://ppa.launchpad.net/sugree/ubuntu intrepid main

or the following for Hardy:
deb http://ppa.launchpad.net/sugree/ubuntu hardy main
deb-src http://ppa.launchpad.net/sugree/ubuntu hardy main

Now we need to update, and install the pidgin-microblog package:
sudo apt-get update && sudo apt-get install pidgin-microblog

After this has installed, restart Pidgin in order for the changes to take effect.
To add a new account: Accounts -> Manage Accounts -> Add


---------------

Pidgin Plugin Pack
The plugin pack offers 30 new plugins that are available for Pidgin. Some of the best plugins are:
Album - Gives the ability to save all your contact's avatars.
Auto Reply - Gives the ability to have an auto reply function to all protocols
Last Seen - Records when a contact was last seen
To install:
sudo apt-get install pidgin-plugin-pack

You will need to restart Pidgin before the effects take place


---------------

LibNotify Package
This is a handy little plugin that allows a little pop up window to appear when a user signs on or offline. (A lot like the Windows MSN does)
To install
sudo apt-get install pidgin-libnotify

To enable, you will need to restart your Pidgin, and then Tools -> Plugins, and enable it there.


---------------

GTK Themes
I have seen many of people across the Internet looking around the Internet for Pidgin themes. I can understand why people would dislike the default look of the Pidgin interface. Personally I like it, But for the people that don't: did you know that you can change the looks of it using a simple plugin?

If you have installed the Pidgin Plugin-Pack above, you will have everything that you need to do this. Under the Plugins window (Tools -> Plugin) enable the plugin Pidgin GTK+ Theme Control Once enabled, click the configure button at the bottom of the window. From this new Window that appears, you will be able to change the color of many things like the cursor, text, hyper-links etc. It also gives you the ability to change the font of the contact window (as the default is a little hard to read at times)


---------------

Extra Smiley Themes
Smileys
To install extra smiley themes, run the following command:
sudo apt-get install pidgin-themes

After restarting your Pidgin, you will be able to select these new themes by:
Tools -> Preferences -> Smiley Themes


If you have any other plugins, hacks or tweaks that you would like to see here, please leave a comment, and I will gladly add them to this list.

Wednesday, 24 December 2008

Xmas Xsnow!

Merry Christmas to all of my readers!
I have been really busy getting everything ready for tomorrow, as I am sure all of you have been. So something short just to get you that extra 1% ready for Christmas!
sudo apt-get install xsnow

xsnow is a fun little application that draws snow flakes, trees and a Santa that travels across your screen! To run it, simply type in: xsnow into the terminal, and view your desktop :)


xsnow
Image from: http://www.flickr.com


Hope you all have a wonderful day!

Tuesday, 23 December 2008

Installing & Using Adobe Air

Adobe AIR is a cross-operating system runtime that enables web developers to use their existing web development skills, code and tools to build and deploy rich web applications and content to the desktop.From: http://onair.adobe.com/air

To download Adobe Air, use the following command to download the .bin file from the official website:
wget http://airdownload.adobe.com/air/lin/download/1.5.2/AdobeAIRInstaller.bin


Before we can begin to install it, we need to apply the right permissions to it. Once that is done, we can then begin to install:
chmod +x AdobeAIRInstaller.bin
./AdobeAIRInstaller.bin

Once installed, you are ready to go!

Sunday, 21 December 2008

Installing & Using Winetricks

Winetricks is a quick and simple way of installing a number of different Windows Runtime Libraries that are often needed to run Windows applications within Wine.

To download Winetricks, you can find the package here: http://www.kegel.com/wine/winetricks [Right Click - Save As]
or download it using the following command:
wget http://www.kegel.com/wine/winetricks


Once downloaded, you can run the program by:
sh winetricks

Or you can install it by changing the permissions on it, and moving it to the /usr/local/bin directory:
chmod +x winetricks && sudo mv winetricks /usr/local/bin

You will now be able to run the application by just typing in winetricks

When running the command from the terminal, a graphical user interface will appear for you to select what libraries it is that you want to install. If you know what libraries it is that you need installing, then you can run a command like the following to speed things up a little:
winetricks corefonts


If you have any problems whilst running this application, then please do leave a comment :)

Saturday, 20 December 2008

Install The Ubuntu Title Font

This font can come in great use if you are wanting to make a banner or an image for one of your blogs or forums. To download, it is as simple as running the following command:
sudo apt-get install ttf-ubuntu-title

The below image is what the font looks like:


Ubuntu font
Image From: http://www.betatype.com

Friday, 19 December 2008

How To Create Your Own Aliases

Aliases are great things to make life much easier when working in the terminal. If you are getting fed up with typing cd /home/me/Desktop/work all the time, then using an aliases, you can simplify that to just typing something like mywork.

so to add your own aliases, you need to add them directly into your .bashrc file.
The format of them should be: alias name='command'
For example, this could be: alias mywork='cd /home/me/Desktop/work'
Now once your terminal session has been restarted, when you type in the command mywork, the command will be executed.

Thursday, 18 December 2008

The Best Hacking Tools For Ubuntu

Nmap

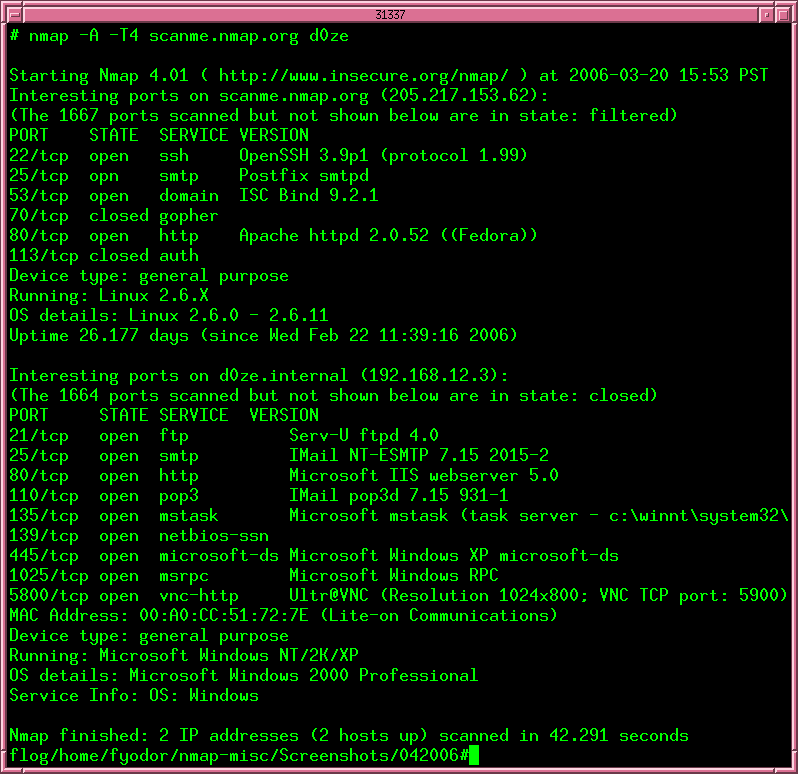
Nmapis one of the best network security scanners out there. Nmap will scan for all the computers and services that are currently running on the network. This application will not only scan for the available services on the network like most other port scanners do, Nmap will try to gather as much information as it can about the remote computers such as which operating system they are using, device type, firewall information, current uptime & the vendor of the network card in use.


Image from: nmap.org


Nmap is included within Ubuntu's repositories. So to install, use the following command:
sudo apt-get install nmap
[A tutorial on how to use Nmap will be coming soon!]


NetCat

NetCat is a fantastic little program written by a guy called 'Hobbit' in 1991. This tool is used for reading and writing to network locations using connections on either UDP or TCP.

NetCat is also in the repositories, so to install, run the following command:
sudo apt-get install netcat

[Tutorial coming soon for NetCat!]


Aircrack-ng

aircrack-ng is the best tool out there for cracking and recovering 802.11 WEP & WPA-PSK keys. Once you have collected enough data packets, you are then able to recover the key from the data packets. This is defiantly a must have application to test your home wireless security.


Image From: aircrack-ng.org


To install:
sudo apt-get install aircrack-ng


[Tutorials on how to run and use this will also be coming soon!]


Do you know an application that should be added to this list? Please do send me a comment, and I'll add it to this list.

Tuesday, 16 December 2008

Download from GetDeb.net Via apt-get


Get Deb


This method is now out-dated! To find out how to add the official GetDeb V2 repository, please view this post:GetDeb V2 Beta


Just thought I'd share this quick tip with you here. I find this very helpful, and saves a lot of time.

The first thing to do is edit the /etc/apt/sources.list file, and add the following line to it:
deb http://ubuntu.org.ua/ getdeb/

Once saved, run the following command to update & upgrade:
sudo apt-get update && apt-get upgrade

Once the above commands have been ran, you will see that any packages that you have downloaded from GetDeb.net will have updated. I find this a lot more easier then downloading the new release, and installing it.

I have found that GetDeb.net does often go down, so if you happen to receive a 404 error when using apt-get update, your best option is to just forget about the error, and try again at a later date.

Any problems with this, then please do leave a comment, and I'll help you out.

Friday, 12 December 2008

Using apt-get With A Proxy Server

So I mainly use my laptop when at Uni now. Recently they have tried (but failed) to stop people using the wireless Internet. They have now set up a proxy server.

This is fine as I have got all the correct settings, so I am still able to connect to the Internet. However, I was having problems using apt-get. If you are having similar problems, then this is how to get around it:

1] You will need to edit /etc/apt/apt.conf file using a text editor.

2] Enter the following lines of text, changing the necessary information to match the settings of the proxy server that you are using:

ACQUIRE {
http::proxy "http://userid:password@proxy-ip:port-number/"
}

Friday, 7 November 2008

The Ubuntu Cow

Firstly, I'm sorry that I have posted much over the last few weeks, I have been away.
Just something silly here to keep you entertained for a few minuets; did you know about the Ubuntu Cows? No?!

the first thing to try out then would be the following command:
aptitude moo

and it will give you the line: There are no Easter Eggs in this program.

aptitude -v moo

This will give you a slightly different message from the first one, and you can go all the way up to:
aptitude -vvvvvv moo

(6 v's)

And something else to quickly try out:
apt-get moo

haha, it kills some time. I'm still not quite sure why Ubuntu is so fascinated with Cows yet.. it maybe something to find out about, and tell you on a future post..

Saturday, 25 October 2008

Auto-Correct Spelling Mistakes In Bash Shell

I am very poor at both typing and spelling, and often make silly little mistakes when typing. The following tweak will help you a lot if you have the same problems. To open and edit the .bashrc you can use any text editor like kate, gedit, vim, nano etc.

At the bottom of your .bashrc file, add the following:
shopt -s cdspell

This will ignore any simple mistakes such as typing cd /otp instead of cd /opt, or cd /ect instead of cd /etc.

Simple, but very effective!

Funniest Ubuntu Image Ever?

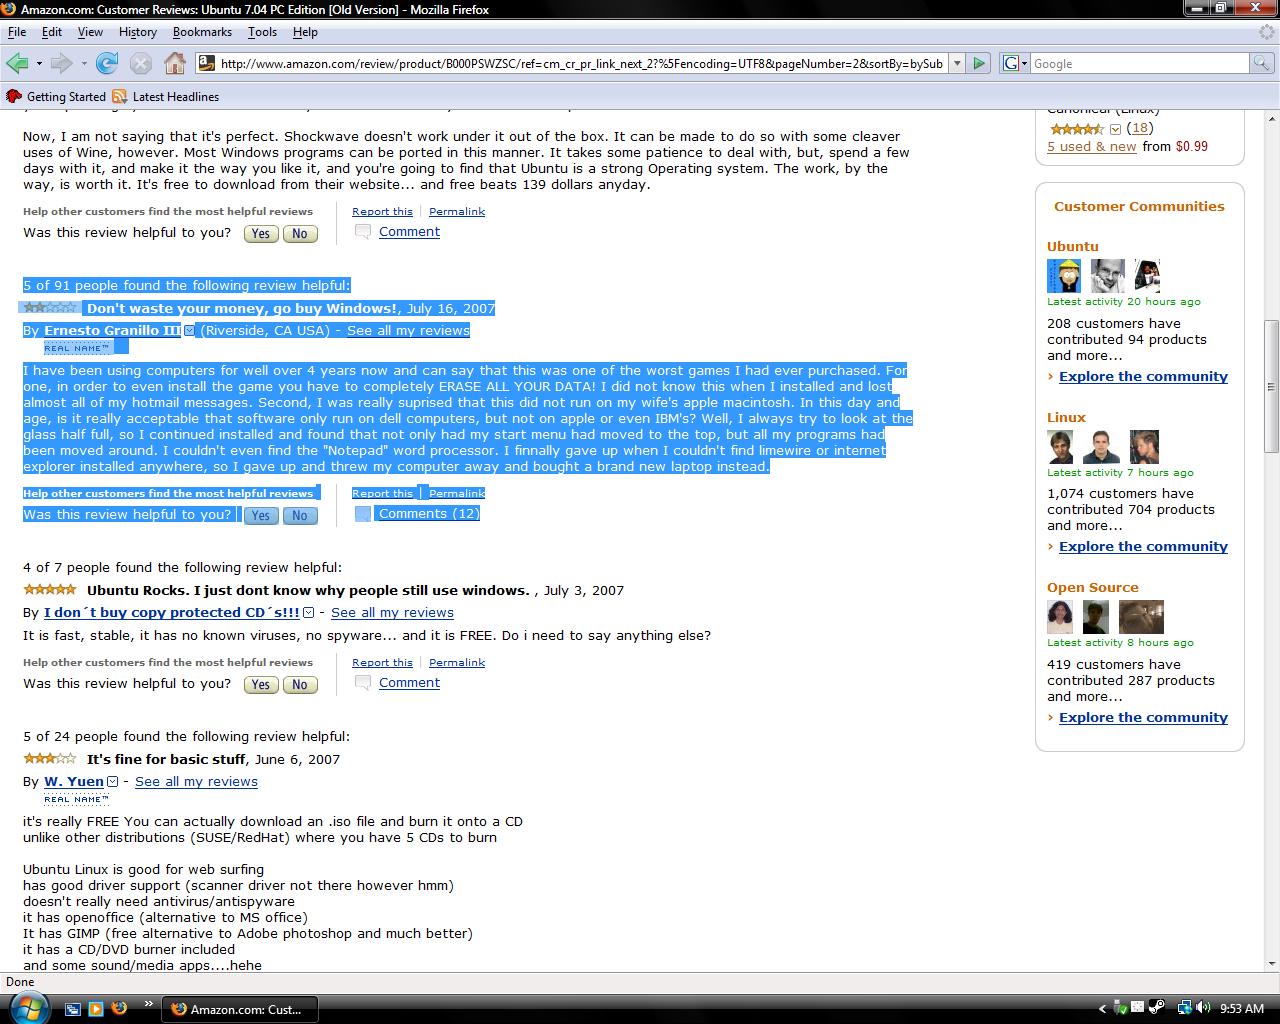
Whilst browsing Fickr the other night, I came across a really funny review that someone had left on Amazon about his purchase of an Ubuntu CD. I take no credit for this image, and here is the link to the page where I found it: http://www.flickr.com/photos/27373994@N02/2554310312/

Funny Ubuntu Image

Thursday, 23 October 2008

How To Watch Any Video In ASCII

Okay, so I got bored at college, and had a play around with some things.. and what I came up with was amazing

First, make sure you have mplayer & LibAA installed:
sudo apt-get install mplayer
sudo apt-get install libaa-bin

Okay, so now here is the cool bit!
(You'll need an AVI video for this... you can download youtube videos from http://www.vixy.net in AVI format)

Once you have an AVI file downloaded and ready to use, you can play the video in ASCII mode using the following command:

mplayer -vo aa xxxxx.avi

Just change xxxxx.avi to your video name .avi

Nice huh?

And if you want to view the video in color, you will need to download and install Caca-Utils:
sudo apt-get install caca-utils

And to paly the video:
mplayer -vo caca xxxxx.avi


Have a look at some of the settings using
mplayer -vo --help

to find how to change the contrast and many other options of the video.

If you have any problems with install or using any of these applications, then please do leave a comment to you, and I will help you as much as I can do.

Thursday, 16 October 2008

Terminator - Ubuntu Application

Terminator is a handy little application that helps users have a number of Terminals on the same screen. With terminator allows you to split the Terminal window both in horizontal and vertical columns and rows.

To install:
sudo aptitude install terminator


Terminator For Ubuntu
Image from: matt.bottrell.com.au


To create a new row or column, simply right click and chose how to split it. I find this application really useful on my MSI Wind, due to the small screen that I have. Having tabs is okay, it makes this so much more easier splitting the screen into two like that.

Saturday, 11 October 2008

Enabling Google Repositories

Enabling Google's Linux repositories is a great way of keeping up-to-date with the latest release of Google Linux applications. Its quick and easy to enable these repositories, so I highly recommend doing it.

First things first, you will need to edit the /etc/apt/sources.list file:
sudo gedit /etc/apt/sources.list

and add the following line at the end of the file:
deb http://dl.google.com/linux/deb/ stable non-free


Now download the key:
wget -q -O - https://dl-ssl.google.com/linux/linux_signing_key.pub | apt-key add -
and finialy update:
sudo apt-get update


You're good to go!

SLiM - Simple Login Manager

Fancie a change from the default login screen?
SLiM, or Simple Login Manager is a simple desktop login manager available for Ubuntu. Although simple, you can configure it to how you like with themes, and configuration files.

SliM comes with the following default theme:

SLiM Default Theme


...Already think it looks sexy? Well, I have found a page with many SLiM Themes. Defiantly worth checking it out! And if you can't find a theme that suits your needs, have a go at making one. I have yet to make a theme of my own, but as soon as I have some spare time, I will create on and see what it turns out like. I'll post it on here for everyone to share :)

Wednesday, 8 October 2008

MSI Wind - Mini Notebook

My Asus EEEPC finally decided to die the other week. I only had it for 9 months, but I don't think I ever turned it of from the first day that I got it. So it did me well and proud. However, it was now time to get a new laptop. After a lot of searching around for the one that would fit my needs the best, I chose to get the MSI Wind.


MSI Wind


At only £299.95GBP ($480-ish) from This Site, I thought that was a great price. When I received my MSI Wind a day later, I couldn't wait to play around on it. I booted it up, and A nice fresh install of OpenSUSE Linux appeared. After a few hours of playing around with it, I decided that I wasn't too fond of it, and set on installing Ubuntu onto it.

Of course, be being an Ubuntu type person, I recommend you install Ubuntu onto it too :)
So first things first, What you will need:

1Gb+ USB Stick
Computer running Windows / Ubuntu
... MSI Wind!

Now to start, you will need to download an ISO Image of Ubuntu 8.04.1. Notice it is 8.04.1 and not 8.04. There were problems when installing 8.04 onto the laptop, freezing up half way through many installations. Ubuntu soon realized this, and released a patch to stop this happening.

Once downloaded, you will need to install a small, and very useful program. This program is available on both Linux and Windows. Download For Linux Here, or for Windows Here

Once downloaded and installed, you will need to select from the drop down menu which version of Ubuntu you are wanting to install. After this, you can select the ISO image that you have just installed, and what drive you want to install it onto. Warning! Make sure that there is no data on your USB stick that you will want to keep! As it will erase everything. Once all your settings are in place, click OK to continue.


UNetbootin For Ubuntu
The screen will look a little like above.

Once complete (It may take a while) you are ready to go! Safely eject your USB stick, boot up your MSI Wind, pop in the USB stick, and Press F11 to enter Boot sequence. Select your USB, and click enter. You will now be prompted with a GRUB Loader. You can either select to test the live mode, or just install it.

Installation is just like any other Ubuntu installation, so I will not write what you need to do. If you are struggling with any parts of the installation, please do comment this post, and I will gladly write a simple step-by-step guide.

So once installed, you may realize that your WiFi isn't working. This is simple to sort out. Connect your MSI Wind to the internet via cable, and use the following command to install all the appropriate kernel headers:
sudo apt-get install build-essential linux-headers-`uname -r`

Next, download, and un-tar the correct drivers needed:
wget http://launchpadlibrarian.net/16098501/rtl8187se_linux_26.1016.0716.2008.tar.gz
tar xvzf rtl8187se_linux_26.1016.0716.2008.tar.gz

And build the driver:
cd rtl8187se_linux_26.1016.0716.2008
./makedrv

Now that the drivers have been installed, run the following command to insert the modules, and enable the WiFi:
sudo ./wlan0up


To map all of the new modules so that the wireless can work from boot, you will need to copy some of the files to the necessary places:
sudo cp -r ieee80211/*.ko /lib/modules/2.6.24-19-generic/kernel/drivers/net/wireless/
sudo cp rtl8185/r8180.ko /lib/modules/2.6.24-19-generic/kernel/drivers/net/wireless/


Lastly, run the following commands to finish the installation of:
sudo depmod -a
sudo modprobe r8180


You now have working wireless. Disconnect from the current wired internet, and any wireless networks that are in range should now be showing up in your network manager applet.

There are a few other little errors that you may notice. This site has a lot of little hacks and tweaks to get your Ubuntu running just how it should do on your new MSI Wind.

Saturday, 4 October 2008

Install Microsoft Fonts In Ubuntu

It is generally a good idea to install the default Microsoft fonts when using Ubuntu. It can help when you are using such software as OpenOffice, giving it the look and feel that you have created the document in Microsoft Office.

Also, many of the websites that have been designed use the default Microdoft fonts. Although Ubuntu uses its own versions of the Microsoft fonts whilst viewing a webpage, it's nice to have these fonts to see how the website should properly look.

Fonts that are included in the msttcorefonts package are:

* Andale Mono
* Arial Black
* Arial (Bold, Italic, Bold Italic)
* Comic Sans MS (Bold)
* Courier New (Bold, Italic, Bold Italic)
* Georgia (Bold, Italic, Bold Italic)
* Impact
* Times New Roman (Bold, Italic, Bold Italic)
* Trebuchet (Bold, Italic, Bold Italic)
* Verdana (Bold, Italic, Bold Italic)
* Webdings


To install the Microsoft Fonts, you need to make sure that you have the Universe Repositories enabled. After you have done this, install the package using the following command:
sudo apt-get install msttcorefonts

You will now have all the core True Type fonts that come with a default Windows installation.

If you want other True Type fonts to use on your Ubuntu, it is as simple as downloading the font you want, and placing it in the ~/.fonts directory.

To use the newly downloaded fonts, you can either log out, and back in again, or use the following command to regenerate the fonts cache:
sudo fc-cache -fv

Thursday, 2 October 2008

Manage Wallpaper With Feh The Image Viewer

Feh is a fast, light weight image viewer. Currently Feh supports slideshows, multiple windows, thumbnail viewing, dynamic zooming, mouse wheel & keyboard control, and the feature to set an image as a background image.

Feh is a great program to have if you are using a window manager like OpenBox, BlackBox etc. As you can set an image as the background, instead of the default grey / black.

To Install Feh, use the following command:
sudo apt-get install feh

You can now right click on an image, and chose to open with 'feh'.

To use Feh to set an image as a background, use the following command:
feh --bg-scale /path/to/image.jpg

Other parameters that you can use are:
--bg-tile
--bg-center
--bg-seamless

Monday, 29 September 2008

Free 'Powered By Ubuntu' Stickers

Powered By Ubuntu

Now how cool would that look stuck on your brand new laptop, or your mates Windows Vista computer (haha)?

To get your free stickers, visit the following site: http://system76.com/article_info.php?articles_id=9

And please do send me pictures of you using your stickers!
- Mine are being sent as we speak (type?)

The Official Ubuntu E-Book

Ubuntu E-Book

Read It Here Or Download It Here

Description:
"Ubuntu is a complete, free operating system that emphasizes community, support, and ease of use while refusing to compromise on speed, power, and flexibility. It's Linux for human beings--designed for everyone from computer novices to experts. Ubuntu is the most in-demand Linux distribution, and this official guide will get you up and running quickly.

Learn how to seamlessly install and customize Ubuntu for your home or small businesses. Its open source power can be used in schools, government, or by corporations, and is suitable for both desktop and server use. The Ubuntu community is built on the premise that software should be available free of charge, and that people should have the freedom to customize and alter their software in whatever way they see fit.

Written by leading Ubuntu community members, this is the only book that you need to become a savvy Ubuntu user."

Sunday, 28 September 2008

Icon Sets For Ubuntu

EDIT: I had an email telling me I had forgot the download links. Sorry! They have now been added!

Fed up of the default Icon sets that come pre-installed on Ubuntu, or do you need a new icon set to fit in with your new theme you have been working on? Well here are some great Icon sets that I have came across whilst browsing the internet over the last few days.

All are free to download! So what are you waiting for?


Somatic
Somatic Icon Set
Download Here

Area o.42
Area 0.42 Ion Set
Download Here

Snowish
Snowish Icon Set
Download Here

As soon as I find more Icon Sets, I'll add to this post.
Ofcourse, if you have found any good icons, tell me about it, and I will happily add them to this post.

Saturday, 27 September 2008

Ubuntu Brainstorm Idea #792

I've been having a good look around on Ubuntu Brainstorm over the last few days. There are some fantastic ideas there, and some.. not so good. If you think you have a good idea for the next release of Ubuntu, wether it's an appearance issue, or a software issue, then create an account, and let your voice be heard!

Many of the best ideas have already been implimented - so they do take action on what we say! A very good one that I came across was the following:


Would be great if we could help get a few more votes for this one, and hopefully in the next release of Ubuntu, we will see this feature.

Voice And Video Support In Pidgin


Now wouldn't that be a cool thing to have in Pidgin?
For me, that is the only thing that lets Pidgin down.

Well, some good news! They are in the process of developing pidgin to support both video and voice. - The bad news is that it isn't going to be done any time soon.
http://developer.pidgin.im/ticket/34

Friday, 26 September 2008

Ubuntu Search Engine

http://www.ubuntux.org/ubuntu-search
Handy little search engine specific to Ubuntu Linux :)
I wouldn't say it’s amazing, Google is still God, but it’s not too bad if you’re searching for something simple.

Convert .RPM files to .DEB

Many Linux distributions use .RPM files, like Red Hat and Fedora; And I have come across many programs that don't come in .DEB, but do come in .RPM.

There is a great program to convert RPM's into DEB's, Alien.

To install Alien:
sudo apt-get install alien

Once installed, you can convert the RPM file like:
sudo alien -k FileName.rpm

To then install the DEB file, you can either double click on it or run the command:
sudo dpkg -i FileName.deb


Or another way to convert and then install straight after, you can run the following command:
sudo alien -i FileName.rpm


Easy Huh?

Wednesday, 24 September 2008

Disable IPv6

Disabling IPv6 can speed up your internet connection (As long as you’re not using IPv6!).
To disable it, you will need to edit the following file: /etc/modprobe.d/aliases
sudo vim /etc/modprobe.d/aliases

And find the 'alias net-pf-10 ipv6' line, and repleace it with the following:
alias net-pf-10 off ipv6

Next step is to reboot, and see if your internet connection id any faster.
To check to see if IPv6 is running, run the following command:
ip a | grep inet6

Monday, 22 September 2008

How To Find Out What Version Of Ubuntu Linux You Are Using

There may be times where you need to find out what version on Ubuntu you, or a customer are using. The following commands can be a big help to an network Admin, or to help customers, and will work both on a Desktop or a Server system.

There are a number of ways in which to find out what version you are running:

cat /etc/issue

The file /etc/issue holds the version number of the Ubuntu that is installed on your system

cat /etc/lsb-release

The above file holds the version number, and some other basic information about the version of Ubuntu that you are running.

Empty The Trash Can Via Command Line

By default, when you delete a file or folder, it gets placed in our trash can. You can easily empty the trash by right clicking on it, and choosing the 'Empty' option. You can also easily empty the trash can via the command line. This may also be your only way if you are running Ubuntu on a server!

rm -rf ~/.Trash/*

- Just be careful when running the rm -rf command!

Saturday, 20 September 2008

Frets On Fire - Guitar Heroes Clone For Linux

I've seen a lot of Guitar Heroes clones that you can play online, and for Windows, but to be honest, most of them suck. Frets On Fire however, is an amazing game! It’s available on Linux, Mac and Windows, and (For Linux) is just as easy as downloading, and executing the main Shell script to get it running.


To Install:
Install the full package from http://fretsonfire.sourceforge.net

Extract the files, and run the main Shell script to run!
- Its as simple as that. Perfect to store on your USB stick.

I had a few problems when first running this game. I found out that if you disable your Compiz before running, it resolves the problems.

Friday, 19 September 2008

Ubuntu 9.04 - Jaunty Jackalope

Ubuntu 9.04, estimated to ship in early April next year, has been given the code name - Jaunty Jackalope. Mark Shuttleworth says that Ubuntu is now ready to compete against the popular Windows and Mac operating systems. He expects to see Ubuntu being shipped on millions of devices in the upcoming year.

This new distribution will be mainly focusing on the boot time, and the overall performance of the operating system. The development team are also planning on bringing better web interrogation to the desktop.


"There are some specific goals that we need to meet in Jaunty. One of them is boot time. We want Ubuntu to boot as fast as possible—both in the standard case, and especially when it is being tailored to a specific device"

Tuesday, 16 September 2008

Commands To Stay Away From

So if you are new to Linux, and you have a problem, chances are that someone else has had the same problem as you on the internet, and has posted a set of commands on how they resolved it.

However, there are a few idiots out there who will post commands that may be very harmful to your computer. The following commands should not be used.. ever! If you are stupid enough to use one of these commands, then it is your fault.. not mine :)

rm -rf / - This will remove everything, starting at your root directory.
rm -rf . - This will remove everything within the current directory.
rm -rf * - This will remove everything within the current directory.

any_command > /dev/sda
dd if=something of=/dev/sda
- Both of these will cause raw data to be written to a device, and can cause total data loss. Defiantly stay away from this command!

:(){ :|:& };: - Causes your system to crash instantly.


You have been warned!

Conky

Funny name and an amazing must have program!
Conky is a system Desktop Monitor, and with a tiny bit of tweaking, you can get it to display anything that you want it to.

Many people have made their own scripts that you can download online. I have seen scripts that display the weather, new mail in your GoogleMail account, what song is play on your media player etc.

At the moment, I have two Conky's running on my desktop:
Conky

To change how your Conky looks, just edit the .conkyrc file within your main directory.

Scripts for the one in the top left:

Conky

# .conkyrc
# By JAM - http://www.jamsubuntu.blogspot.com

update_interval 1.0

double_buffer yes
own_window yes
own_window_hints undecorated,below,skip_taskbar

use_xft yes
xftfont Bitstream Vera Sans:size=8

background yes
own_window_transparent yes
minmum_width 250
default_color white
alignment top_left
gap_x 15
gap_y 15

uppercase no

TEXT

${color #ff0000}Name PID CPU% MEM%
${color #ffffff} ${top name 1} ${top pid 1} ${top cpu 1} ${top mem 1}
${color #ffffff} ${top name 2} ${top pid 2} ${top cpu 2} ${top mem 2}
${color #ffffff} ${top name 3} ${top pid 3} ${top cpu 3} ${top mem 3}
${color #ff0000}Mem usage
${color #ffffff} ${top_mem name 1} ${top_mem pid 1} ${top_mem cpu 1} ${top_mem mem 1}
${color #ffffff} ${top_mem name 2} ${top_mem pid 2} ${top_mem cpu 2} ${top_mem mem 2}
${color #ffffff} ${top_mem name 3} ${top_mem pid 3} ${top_mem cpu 3} ${top_mem mem 3}

${color #ff0000}Local Weather:
${color #aaaaaa}${execi 1800 /home/jam/weather.sh}


Weather.sh
#!/bin/sh

#
# Grab weather data from weather.com and format it according to the given XSLT
# Script written by boojit
# Modified by Hellf[i]re
# The original script and xslt can be downloaded from http://pondol.com/weather.tar.gz

# Usage:
# ${execi 1800 /path/to/weather/weather.sh location}
# Usage Example:
# ${execi 1800 /home/user/weather/weather.sh 03833}

# your Location ID: use http://xoap.weather.com/search/search?where=[yourcity] to find it
# U.S. users can just use their zip code; doubt that works for anyone else though (YMMV)
LOCID=UKXX0272

# s=standard units, m=metric units
UNITS=m

# where this script and the XSLT lives
RUNDIR=/home/jam

# there's probably other stuff besides CURL that will work for this, but i haven't
# tried any others.
# you can get curl at http://curl.haxx.se/
CURLCMD=/usr/bin/curl

# get it at http://xmlsoft.org/XSLT/
XSLTCMD=/usr/bin/xsltproc

# you probably don't need to modify anything below this point....

# CURL url. Use cc=* for current forecast or dayf=10 to get a multi-day forecast
CURLURL="http://xoap.weather.com/weather/local/$LOCID?cc=*&unit=$UNITS&dayf=2"

# The XSLT to use when translating the response from weather.com
# You can modify this xslt to your liking
XSLT=$RUNDIR/weather.xslt

#filter (if you want to convert stuff to lower-case or upper case or something)
#FILTER="|gawk '{print(tolower(\$0));}'"


#####
eval "$CURLCMD \"$CURLURL\" 2>/dev/null| $XSLTCMD $XSLT - $FILTER"


Weather.xslt


Script for the one in the bottom right:
# .conkyrc
# By JAM - http://www.jamsubuntu.blogspot.com

update_interval 1.0

double_buffer yes
own_window yes
own_window_hints undecorated,below,skip_taskbar

use_xft yes
xftfont Bitstream Vera Sans:size=8

background yes
own_window_transparent yes
minmum_width 250
default_color white
alignment bottom_right
gap_x 15
gap_y 0

uppercase no

TEXT
$nodename - $kernel

${color lightgrey}Uptime:$color $uptime $alignr${color lightgrey}Load:$color $loadavg
${color lightgrey}CPU: $color ${freq} Mhz $alignr${color lightgrey} Usage:$color $cpu%
$color${cpugraph}

${color lightgrey}Processor temperature: $color${acpitemp}°C

${color lightgrey}Battery: $color ${battery}

${color lightgrey}RAM usage:$color $mem/$memmax - $memperc%
${membar}

${color grey}Disk usage: $color${fs_free /} of ${fs_size /}
${fs_bar 6 /}

${color #ffcb48}Wi-Fi ${hr 1}
${color lightgrey}Wireless signal: $color${wireless_link_qual ath0}%
${color lightgrey}IP address: $color${addr ath0}
${color lightgrey}Download speed: $color${downspeedf wifi0} Kb/sec
${downspeedgraph wifi0}
${color red}Downloaded: $color${totaldown wifi0} $alignr ${color green}Uploaded: $color${totalup wifi0}

${color #ffcb48}Ethernet ${hr 1}
${color lightgrey}IP address: $alignr$color${addr eth0}

Friday, 12 September 2008

Sexy Ubuntu Wallpapers

As if Ubuntu wasn't sexy enough, this article will show you the sexiest wallpapers that I have found for Ubuntu. Please feel free to download them, and use :)

Sexy Wallpaper 1

Sexy Wallpaper 2

Sexy Wallpaper 3

Sexy Wallpaper 4

Sexy Wallpaper 5

I have not created any of these wallpapers; I've just collected them from the net. All credit goes to the authors of these images.

Thursday, 11 September 2008

How To Change Your MAC Address

This is just a quick and simple tutorial to show you how to change your MAC address, for what ever reason you may have, in Ubuntu.

So to change your MAC address, you need to edit the /etc/network/interfaces files:
sudo gedit /etc/network/interfaces


The file should look a little something like this:
auto eth0
iface eth0 inet dhcp


And you will need to change it to something like:
auto eth0
iface eth0 inet dhcp
hwaddress ether 01:02:03:0A:0B:0C


Ofcourse,you will need to change the MAC address to suit your network.
to make the changes take effect, reboot the networking service:
sudo /etc/init.d/networking restart

Wednesday, 10 September 2008

GIMP Addons & Hacks

GIMP-Shop
This is a modification of the GIMP software package,to give GIMP the look and feel of the Adobe Photoshop package. As the GIMP-Shop's interface replicates Photoshop, many of the tutorials that are written for Photoshop can be used on GIMP-Shop!

So, how to install?
Download the .DEB file from Here.
Once it has downloaded, use the following command to install:
sudo dpkg -i gimpshop_2.2.11-1_i386.deb

Now GIMP will be ready to use. When you first start GIMP up after the GIMP-Shop installation, you will be prompted with a new window, and follow the simple instructions to begin :)

Run GIMP In One Window[Thanks to xubuntu.wordpress.com for this]
sudo apt-get install xnest xfwm4


Then run this command to try it out:
Xnest :1 -ac -name GIMP -geometry 1024x690 & xfwm4 --display :1 & gimp --display :1


So Here's how to make a shortcut for it:

1: Paste the following into a new file:
#!/bin/sh
Xnest :1 -ac -name GIMP -geometry 1024×690 & xfwm4 –display :1 & gimp –display :1

2: Save it as /usr/bin/gimp1window
3: run
sudo chmod +x /usr/bin/gimp1window
on the file
4: Edit the shortcut for GIMP to gimp1window


If you have any other GIMP hacks or addons, please leave them in a comment, and I'll gladly add them :)

Saturday, 6 September 2008

Watch Live TV On Ubuntu

Zattoo have developed a great application that allows you to watch live TV on your computer or laptop. All you need to run this application is broadband internet, and of course, Linux. This is 100% free & legal!

To Read more on Zattoo, and to download, please visit this link: Download Zattoo

Edit (31 Dec 09):
For a while now, Zattoo have said they have had problems with their Linux version, and have taken Linux of from their supported Operating Systems. A message used to be there saying they are doing all they can to fix the Linux version.

After checking back today, it seems that they were unable to fix any problems they had, and no longer are trying to sort it out. they have completely removed Linux from their downloads page now. Taking a look in their FAQ section, and I only came across this: "Zattoo does not support Linux platforms anymore."

Let's hope sometime in the future they will have a working Linux version up and running again.

Friday, 5 September 2008

Easy Way To Set Up Your Own Web Server

So, first things first, why would you want a web server?
I use mine to test out new things that I come up with Have you ever tried to view a PHP file? All you get is the code. If your making a new website, its a bit annoying uploading it to the online web server, viewing it, making more changes... re-uploading it again.. and so on.

So, there are many tutorials on the internet that explain how to set up Apache, MYSQL, PHP, Perl & a FTP server. I remember trying to get it up and running on my laptop. Although I got it working fine, I still thought it was a bit of an arse ache. - and if I were really new to Linux,I wouldn't have a clue to what I was doing

XAMPP
This is a great piece of software that you should use if you want web server up and running. XAMPP comes with Apache, MYSQL, PHP, & Perl.

You can get XAMPP for the following Operating systems:

Windows
Comes with: Apache, MySQL, PHP + PEAR, Perl, mod_php, mod_perl, mod_ssl, OpenSSL, phpMyAdmin, Webalizer, Mercury Mail Transport System for Win32 and NetWare Systems v3.32, Ming, JpGraph, FileZilla FTP Server, mcrypt, eAccelerator, SQLite, and WEB-DAV + mod_auth_mysql.

Linux
Comes with: Apache, MySQL, PHP & PEAR, Perl, ProFTPD, phpMyAdmin, OpenSSL, GD, Freetype2, libjpeg, libpng, gdbm, zlib, expat, Sablotron, libxml, Ming, Webalizer, pdf class, ncurses, mod_perl, FreeTDS, gettext, mcrypt, mhash, eAccelerator, SQLite and IMAP C-Client.

Mac OS X

Comes with: Apache, MySQL, PHP & PEAR, SQLite, Perl, ProFTPD, phpMyAdmin, OpenSSL, GD, Freetype2, libjpeg, libpng, zlib, Ming, Webalizer, mod_perl, eAccelerator, phpSQLiteAdmin.

Solaris
Comes with: Apache, MySQL, PHP & PEAR, Perl, ProFTPD, phpMyAdmin, OpenSSL, Freetype2, libjpeg, libpng, zlib, expat, Ming, Webalizer, pdf class.

-----------------------------------------------
So why download and use XAMPP?
A few reasons, firstly its free of charge - Always a good thing.
The second, anyone can download, install and use it, its that easy.

For Windows & Linux, you can download it as a portable application, which means you can have it running on your USB stick, or from a folder on your C:\. (or /opt for Linux)

For Windows, I belive you can just double click on the main .EXE file to run. on Linux,
sudo /opt/lampp/lampp start


Once you have it up and running, go to: http://localhost/ and you will see the default website. Upload your own files to the default location, and you will see your website there

Note! : This method should 100% NOT be used to have a live website running from your home PC. XAMPP is designed for ease of use for your own testing purposes only! On a default install, there is no root password for MYSQL, the MYSQL database is accessible via the network & PHPmyAdmin has no password.


To view your website from outside of your network, you will need to divert all traffic on the port 80 to your PC / Laptop which has XAMPP running. To access the website from outside of your network, you will need the IP Address, or to set up a dynamic DNS. (I might write a tutorial on how to do this later on).

I wouldn't really recommend this though, as for the reasons mentioned above

Jam

Own Your Own Domain Suffix

I want my own personal website, like a lot of people do.... so I check the whois database, but JamieWard.com had already been taken, as was .net, and .co.uk - bummer.

More then likely, any domain name you want, has already been taken, as Over 20 million '.com' domain names have been registered!

Q: So, with all the best domain names taken up, what are you supposed to do?
A: Wait until May, 2009.

Why? Because come April / May 2009, The Internet Corporation for Assigned Names and Numbers (ICANN) have recently approved this proposal allowing you to buy domain suffixes! Great News!

When I say allowing 'You', you have to own a company to be able to buy one. Who knows though, if it proves to be popular and successful, it may become open to the average person to buy one.

Hmm, I'll have the .Jam suffix - Iam.Jam

... images.google.google? Hmm.. may get a bit confusing.

Oh, one last thing I should mention.. the average price for a top level domain, (the suffix) is anywhere between $50,000 - $100,00 (USD). .Google, .Microsoft of course are going to be a high amount more.

FireFox about:config Hacks

Select all of the URL in the address bar with one click:
Find browser.urlbar.clickSelectsAll, right click, and chose toggle.

Firefox has this little built in feature that downloads pages from links that it thinks you may click on (eg. the top result on Google). This ofcourse means you use up a lot more bandwidth, and CPU power. To stop this, set network.prefetch-next to false.


To turn of chrome tooltips, you need to change browser.chrome.toolbar_tips to false

This next tweak is great for speeding up FireFox for broadband users.
find and change network.http.pipelining to true.
find and change network.http.proxy.pipelining to true
Change network.http.pipelining.maxrequests to 8.
Now instead of making one request each time, it will make 8. (this means pages are loading a lot faster!) Now a lot of places on the internet will tell you to set it to 30. Don't do that :) Firefox will normally only let you make 8 requests at a time, and even if you could make 30 requests, most servers wouldn't allow it, and result in your IP address being blocked.

To finish it off, right click, and make a new Integer. Name this nglayout.initialpaint.delay,and give it the value of 0. This tells the browser to wait 0 seconds before receiving information. Again, this speeds up the rate at which it loads pages.


If you have any more tweaks that you know of, please leave them in a comment, and I'll gladly add them to my list.

Thursday, 4 September 2008

Is Ubuntu The Best Distribution For You?

Thinking of trying out Linux?
Is Ubuntu the right Linux for you?
Well as you may /may not know, there are many different distributions of Linux. So how do you know which one is right for you?

This site below asks you a number of simple questions, and from the results, it lists all the versions of Linux that are most suitable for you.

http://www.zegeniestudios.net/ldc

Decrease Boot Time

When you first install Ubuntu, the boot time is great! However, after months and months of installing and removing programs, it can start to lag. Following the steps below will help to reduce your boot time by quite a few seconds!

Before you start, I must say I've only tested these steps in Ubuntu Gusty Gibbon. As always, use caution when issuing any commands with root privileges.

Okay, so to start of, install a cool little application called BootChart.
This will monitor everything that happens when booting your computer up.
It puts everything into a chart for you, so you can see what is taking
the most time to start.

Install BootChart
sudo apt-get install bootchart
Next you ill have to reboot your computer.
Once rebooted, and you are logged in, navigate yourself to: /var/log/bootchart, and in here will be a png image describing how long each process took to boot up.

Ubuntu Hack
Open up the file: /etc/init.d/rc in your favourite text editor.
CONCURRENCY=none
Change the above line to the below line.
CONCURRENCY=shell
Install a Boot Process Adjustment Tool:

sudo apt-get install sysv-rc-conf

Then run the application using:
sudo sysv-rc-conf
(To turn a device of, un-tick all the tick boxes within that row)

What to turn off:
bluez-utiles
Since I do not use any bluetooth tools, I turned this of.
If you use any bluetooth tools on a regular basis, I'd keep this on.

dns-clean
This is used to clean the DNS information when using a Dial-Up connection.
As I do not use Dial-Up, I turned this of. If you are using Dial-Up... Keep it on!

fetchmail
This is a mail receiving daemon. As I only use Hotmail, I turned this off.
hplip
HP printing and Image subsystem. As I do not have any printers ever connected to my
laptop,I turned this off.

mdamd-raid
If you do not use any RAID devices, there is no need for this tool to be turned on.

mdamd
A RAID management tool. Again, I do not use any RAID devices, so I turned this off.

PPP & PPP-DNS
Both of these are useless to me, as I do not use Dial-Up.

Once finished turning of the un-necessary processes, reboot your computer. Once rebooted, take a look at your bootchart which you installed earlier on. Notice the time difference?

If you have any other ways on how to make Ubuntu boot faster, please do share.

Wednesday, 3 September 2008

Increase Your Battery Life

As my laptop is getting kinda old now, the battery isn't as good as it used to be. I came across this handy little application by Intel called PowerTop. Its surprising how much you can extend your battery life with this.

To install:
sudo apt-get install powertop
To Run:
sudo powertop
PowerTop will scan your laptop for 5 seconds, and then report back with the hardware or software that has the biggest drain on your battery life. PowerTop will then provide you with a simple shortcut key to fix the problem. (If you want to make the changes permanent, you will have to edit the right config files. It will explain how to do this at the bottom of the screen!)

Gnome Useful Keyboard Shutcuts

Alt+F1 : Open The Applications Menu
Alt+F2 : Run The Application Dialog
Alt+F9 : Minimize The Active Window
Alt+Tab : Rotate Current Window Focus
Ctrl+Alt+Left Arrow : Move The Virtual Desktop To The Left
Ctrl+Alt+Right Arrow : Move The Virtual Desktop To The Right
Ctrl+Alt+Shift+Left Arrow : Move The Current Application To The Left
Ctrl+Alt+Shift+Right Arrow : Move The Current Application To The Right
Ctrl+Alt+L : Lock Screen
Ctrl+Alt+Del : Log Out
Ctrl+Alt+Backspace : Kills X

Open Office Easter Eggs

As if Open Office wasn't amazing enough, they have packed their software full of Easter Eggs!

OpenOffice Calc
Putting =GAME() into any cell, results the text "say what?" in that cell.

Putting =GAME("Froggie") into any cell results in the cell displaying the text "Froggie". Putting =GAME("Froggie") into any other cell afterward displays the text "oh no, not again!"

If you place the formula =GAME(A2:C4;"TicTacToe") into cell A1, and press enter, a version of the Tic-Tac-Toe game is playable

Place =GAME("StarWars") into any cell within the spreadsheet, and press Enter. A version of Space Invaders is now playable. Once you have finished the game, and you wish to play it again, you will recive the message: "oh no, not again". You must fully close OpenOffice.org in order to play the game again.

Putting =TTT() into any cell and pressing Enter will result in random smiley appearing. :-] ;-] B-) 8-}


OpenOffice Writer
If you enter "StarWriterTeam" (without the quotes) into a blank document, and then press F3, the names and pictures of the StarWriter Development Team appears

If you enter "GoOOTeam" (without the quotes) into a blank document, and then press F3, the names and pictures of the GoOO Development Team appears

Downoad Youtube Videos

I have recently came across a very useful program for Ubuntu. Youtube-dl is a simple command line application that allows the user to download any video form Youtube.

Installation
sudo apt-get install youtube-dl

Usage
youtube-dl http://www.youtube.com/watch?v=pySDZ2uSWxM

A fast and simple way of downloading your favorite Youtube videos.

Cubuntu

Cubuntu is a fully featured, command line base Ubuntu. Cubuntu comes complete with Web Browsers, Email Clients, Media Players, RSS Readers & plenty of games to keep you entertained.

Included Packages in Cubuntu 0.4 :

Audio / Video

  • cplay
  • emacspeak
  • espeak
  • festival
  • mpg123 | mpg123
  • mplayer-nogui
  • sox
  • speex
  • vorbis-tools

Graphics

  • caca-utils

Internet

  • elmo
  • gftp-text
  • irssi
  • links2
  • lynx
  • mutt
  • raggle
  • rTorrent
  • slrn
  • tinyric

Accessories

  • emacs
  • gpm
  • screen
  • vim

Games

  • bsdgames
  • dopewars
  • empire
  • nethack-console

Essentials

  • python-id3
  • python-pyvorbis
  • ubuntu-minimal


So, how do you install cubuntu?
Its quite easy really.

1. Add the following line to /etc/apt/sources.list:
deb http://alecjw.zexxo.net/apt edgy main

2. Install cUbuntu using the following commands:
sudo aptitude update
sudo aptitude -y dist-upgrade
sudo aptitude -y install cubuntu